🔗 1000 Paper Cranes
1000 Paper Cranes challenge
What do I do?
Press the button and get a random selection of front end tools.
Rebuild this website using the tools you have selected.
What is 1000 Paper Cranes?
1000 Paper Cranes is a front end challenge. It is designed to be a fun and engaging way to learn HTML, CSS and JavaScript. Through making and remaking with different tools, we will explore how other developers have encountered and solved problems in web development.
It is obviously inspired by the great CSS Zen Garden.
There are many ways to solve the same problem. What are the pros and cons of each approach? How do you decide which approach to take? Why do some developers prefer one approach over another?
If you build it, you will learn.
You must use the tools given in the selection. You can use other tools as well if you want, but you must use the tools in the selection to complete the challenge.
Not exactly. There are some rules you must follow, and some things you can change:
What must be the same:
You must use the same rules
The about page must have the same text, and the same rules. You can’t change the rules, or add or remove text from the about page.
You must use the tools defined in site/data
If you look in this folder, you will find there is extra information about each tool, which you might want to use in your design. You can query these json files directly from your website, or you can copy them into your project and use them as you wish, but you can’t add or remove tools.
You must use the html structure
You must use the html structure given. You may add things (classes, more elements), but not remove anything.
Your page must score 100% on Lighthouse Accessibility
You can check this by running Lighthouse in Chrome DevTools.
What can be different:
You can make it look however you want! You can bring in more data from the provided data files. You can add extra features if you want. You can use different colours, fonts, images, etc. It would be fun to recreate this website exactly using your combo, and then “refold” using the same combo, to make it look or feel different.
You should aim to build this website at least ten times, so how will you make each one different and a development of your skills?
Reading code is a great way to learn. You can see how someone else has solved a problem, and then you can apply that solution to your own problem. You can also see how someone else has written code, and then you can use that style in your own code.
Blindly copy-pasting code is rarely wise if you are actually trying to learn something. Consider your goal: you are here to develop your skills and get a good job in tech. Copypaste is not a marketable skill. So read the code and understand it. Then apply it to your own project.
You can use the cranes challenge in groups as well as on your own. As you should aim to build this website at least ten times, building in a group sometimes is a good way to mix it up and get more development from the challenge.
This challenge is for anyone who wants to play! We made it for Code Your Future trainees, but it is open to anyone who wants to learn.
The most interesting submissions will be merged and shown in a gallery. If you want to be in the gallery, you must submit your work as a pull request to this repository.
You will need a computer with a web browser and an IDE. You will also need a GitHub account.
For some combinations you will need to install more tools, like Node.js, Homebrew, Go, Ruby, Python, etc. You will need to install these tools yourself. Click through and follow the instructions. Everything is free.
Clone this repository and change into the repo directory:
git clone git@github.com:CodeYourFuture/1000-Paper-Cranes.git && cd 1000-Paper-Cranes
Create a new branch for your work:
git checkout -b crane/your-combination-your-name
Make a new directory for your work and change into it:
mkdir cranes/your-combination-your-name && cd cranes/your-combination-your-name
Build your website!
Commit your work regularly, making many small commits with descriptive messages. When you are happy with your crane, open a pull request to merge your branch into the main branch. You can do this from the GitHub website.
Acceptance criteria
- The page must be built using the tools given
- The page must be built using the html structure given
- The page must be built using the rules given
- The page must be built using the data given
- The page must score 100 on Lighthouse Accessibility
🔗 CLI Treasure Hunt
Command Line Treasure Hunt
Travel around the game to follow the clues to the answer.
Objectives
- Navigate a file system using the command line
- Create, list, and move files and folders
Rules
- You can only use the command line. Don’t use the Finder or VSCode files or anything like that.
- Type
node clue.jsevery time you land in a new folder. - When you’ve got the answer, keep the secret!
- Type
node clue.jsnow.
🔗 Codewars API
Codewars-Integration
Let’s play with grabbing some data from an API and displaying it on a website. We will be using the the Fetch API to make requests to the Codewars API and the Web Components API to display the data we get back. Let’s go!
- Explain how components are used in web development
- Adapt an existing web component to show your own data
- Extend this web component to present more data from the Codewars API
- Create a new web component that presents data from the Codewars API
Requirements, Steps, and Acceptance Criteria
Open the
index.htmlfile in your browser and you should see a basic badge with the CodeYourFuture Codewars rank. The badge is a web component that is defined in thecodewars-badge.jsfile.Find the js module in the
index.htmlfile that linkscodewars-badge.js. This module defines a new HTML element called<codewars-badge>, which you can now use just like any other HTML element. (This is basically how all HTML elements are defined, it’s just that the browser defines the default ones for us.)Open the
codewars-badge.jsfile. The badge is defined as a class that extends theHTMLElementclass. TheconnectedCallbackmethod is called when the element is added to the DOM. In this case it runs when the page loads. This callback is where we (a) make the request to the Codewars API and then (b) render the data we get back.Change the
usernamevariable in thecodewars-badge.jsfile to your own Codewars username. Save the file and refresh the page to see your own badge.Look at this API directly in your browser. It’s just a URL - you can look at it. (Install a JSON viewer extension for your browser if you don’t have one already. This will make it easier to read the data.)
Now try adding some more data to the badge component. There’s lots of other possible data we could display in the badge. Read the Codewars API docs to help you.
Now try creating a new web component that displays some data from a Codewars API. There are several documented Codewars APIs you can play with. Use the
codewars-badge.jsfile as a template for how to define a web component. You can use theindex.htmlfile to test your new component.
Remember: keep it simple!
You don’t need to make a full web app. Just make a web component that displays some data from the Codewars API. Explore and get creative. If your component gets complicated, break it down into smaller components and compose them on the page, just as you would do with any other HTML elements.
Acceptance Criteria
- I have adapted an existing web component to show my own data
- I have extended this web component to present more data from the Codewars API
- I have created a new web component that presents data from the Codewars API in my own way
- I have tested my page with Lighthouse and my Accessibility score is 100
- I have opened a pull request with my changes to this repo
- I have explained how components are used in web development, in my own words, in my pull request message
Resources
Think of Fetch as your new puppy. Send fetch to an API and tell it to fetch you some data. Fetch! Then await your response. Fetch will dash back to you, panting, with the data you requested, or an error if something went wrong. This is your response. Stuff that response into a variable and do whatever you want with it.
=> https://developer.mozilla.org/en-US/docs/Web/API/fetch
This is how your Codewars progress is tracked automatically by CYF. We use the Fetch API to make requests to the Codewars API and then we record your points in the trainee tracker. You could make your own tracker if you wanted to!
What is a web component?
If you want HTML to do something that it doesn’t do by default, you can write your own custom HTML element. This is called a web component.
…What is a component?
A component is a reusable, self-contained piece of code. Components are like lego blocks you can build websites with. Most websites are made by “composing” components in this way.
Are all websites built with web components?
Nope! React components are written with React, Twig components are written with Twig, etc. Components are not a specific technology, they are a concept. Everywhere in programming we look to break down our code into small, reusable pieces. Web components are a way to do this with HTML.
🔗 CYF Election
Code Your Future JS Core 3 Project
Installation
Clone this repo using the command
git clone https://github.com/CodeYourFuture/cyf-election.git
Introduction
After a recent referendum, London has gained independence from the rest of the UK. A snap election will be held in a month to decide who will be the leader of the new country. You have been asked to implement an electronic voting system in javascript which allows the government to easily register voters into the system, filter out invalid votes and calculate who the winning candidate is.
The three files you will be working on during this project are the following:
election.js- Contains all of the functions required to carry out the election process. From part 2 onwards this file will be modularised into classes.index.html- Displays the election results. From part 2 onwards this file will also take user input.voters.json- The “real” voter data. This file will not appear until the election occurs at part 3.
In order to make the project more manageable, it has been broken down into three parts. They are outlined below.
- Part 1: write the functions required to carry out the election process, and allow the results with a small amount of sample data to be displayed on a HTML page.
- Part 2: re-organise the functions into three classes:
Voter,CandidateandElection, and improve the voter validation process. Allow new voters to be inputted via a HTML page. - Part 3 (election time): run the election on a large population stored as a JSON file.
Voter Data Format
Have a look at the sample voter data provided in
election.js. You will notice that the voters are stored as an array of objects,
and that their voting card is an array of integers. Each integer in the votingCard array represents a
candidate id where each ID has double the weight of the ID on its right.
So for example, if my votingCard array is [1,3,2] I cast 1 vote for candidate 1, I cast 0.5 votes for
candidate 3 and 0.025 votes for candidate 2.
Candidate Data Format
Now look at the sample candidate data. Like the voter data, each candidate is stored as an object but with some different properties. You should also notice that unlike the voter data which is stored as an array of objects, the candidate data is stored as an object containing objects. Each object key represents the ID of the candidate. For example the candidate Tamara Faiza has candidate ID 1.
The numVotes property in each candidate object represents the number of votes that candidate received in the election.
When a new instance of a candidate is created, their numVotes property should always be 0.
Part 1
Exercise 1
Candidates should also be able to vote in the election, however right now the format of candidates isn’t such
that we can just concatenate it onto the votingPopulation array.
Write a function candidatesObjToArray which takes
the candidates object as input, and returns an array of candidates which can be joined onto votingPopulation.
Hint: You might find the
mapfunction useful.
Exercise 2
Before we worry about how to calculate the election results, we need to introduce some definition of an invalid voting card. Right now we regard a voting card as invalid if it contains more than two votes, or contains multiple votes for the same candidate.
Write a function filterInvalidVoters which
removes any voters who have voted for more than 2 people, or have voted for the same person twice.
This function should input the allVoters array, and return an array containing only valid voters.
Exercise 3
Right now all candidates have numVotes set to 0. Write a function runElection which takes the votingPopulation and
candidates as arguments. The function should change the numVotes property of each candidate based on the voting cards
of the voters, and return a candidates object with each candidate having an updated numVotes value.
Exercise 4
Write a function getWinner which takes the updated candidates object as input, and returns the candidate with the most votes if there is no draw. If there
is a draw, the function should return null.
Exercise 5
Write a function printWinnerMessage whose input is the winner previously calculated by getWinner. This function should print “The election was a draw” if a draw occurred,
otherwise it should print a message including the winner’s name and how many votes he/she received.
Exercise 6
You have permission from the government to change people’s voting cards because the real election hasn’t occurred yet.
If the previous 5 exercises were completed correctly, you should see a message saying that Tamara Faiza has won the election with 3.5 votes. Change
Nour al-Din’s voting card from [4,1] to [4,3] and you should notice that a draw has occurred.
Part 2
This part builds upon the functions you designed in the previous part. You will change your election system to use classes instead of being a loose set of functions and objects, however the functionality of the voting system should be the same.
The javascript code for this part should be written in election-part2.js.
Exercise 1
Write a class Voter which can be used to create a new voter object. As before, a voter object should have variables for name, age and votingCard.
After creating the class, use the new keyword to initialise all of the voters in the votingPopulation array. For example, Jane Finnegan should be
initialised as new Voter('Jane Finnegan', 19, [1,3]).
Exercise 2
Write a class Candidate which extends voter. Since candidates are voters, the candidate object should also have variables for name, age and votingCard.
However a candidate has some extended properties: variables storing the party he/she belongs to and the number of votes received.
After creating the class, use the new keyword to initialise all of the candidates in the candidates object. For example, Tamara Faiza should be
initialised as new Candidate('Tamara Faiza', 46, 'Pizza Party', [1,1]).
Hint: Recall the
extendskeyword andsuperfunction from week 11.
Exercise 3
Write a class Election which models the election. An election is performed by a group of voters and a group of candidates, so the Election class
should input and store an array of valid voters and an array of candidates, with the people in each array being the same as in part 1. The class should also
have a winner variable used to store the winner.
The Election class should also contain three functions: runElection(), getWinner() and printWinnerMessage(). The runElection() function should act the same way as in part 1,
this time altering the voting cards of the candidates class variable. The function getWinner() should also be as in part 1, this time setting the winner
class variable after the winner is calculated. printWinnerMessage() should print a message as before including who won, and how many votes he/she received.
An election should be initialised as let election = new Election(validVoters, candidates);
Exercise 4
Design and write a user interface in HTML that allows users to visit index.html and view the list of voters and candidates. Users should be able to
press a “Run Election” button, which runs the election and prints the winner message on the page.
Stretch goals
In the index.html page, include an input system that allows users to add and remove voters and candidates.
Part 3
The day of the election has come, but the turnout was very low. A json object containing 200 voters and 10 candidates has been provided to you through the endpoint at http://www.mocky.io/v2/5a55224b2d000088425b1ed8
This part of your assignment involves linking this data up with the work you have already done.
Exercise 1
Look at the json object provided at the beginning of part 3, and make sure you understand the structure of the data.
There are two arrays in this object, one called "candidates" and one called "voters". These arrays contain objects representing candidates
and voters similar to those that you encountered in part 1.
Note in particular that "candidates" is an array of objects, not an object of objects like in your implementation. Each candidate object in this array
has an attribute id, which corresponds to the object keys in the candidates object used in parts 1 and 2.
Exercise 2
Write a function fetchElectionData which fetches the json data provided to you. You should print the data to make sure that your fetch
function works.
Exercise 3
Put your fetchElectionData function in election-part2.js. After the data has been fetched, change your votingPopulation array to be an
array of Voter objects and your candidates object to be composed of Candidate objects. This involves using the new Voter and new Candidate
declarations just like part 2, but this time there should be 200 voters and 10 candidates.
Note again that candidates is given as an array, but your code works with candidates as an object. You will need to make the appropriate conversion here.
Exercise 4
Run your code with the new data you should find the the winner is Eli Wang, with 26.5 votes.
🔗 First Timers
First Timers: Open Source
No.
OSS is licensed, which means that you can use it, but you can’t use it in a way that breaks the license. Our Syllabus is CC-BY-SA, which means other schools can (and do) copy the content and use it in their own courses, but they can’t sell it and they have to say where the content came from.
You do have to check the rules before using Open Source software in commercial projects. (Most Open Source software is licensed under the MIT license, which allows commercial use.)
The gang’s all here:
- Here’s Facebook on GitHub: https://github.com/facebook
- Here’s Apple https://github.com/apple
- Here’s Google https://github.com/google
- Here’s Twitter https://github.com/twitter
- Here’s Amazon https://github.com/aws
Every major tech company develops Open Source projects. They’re all here on GitHub. Most major governments have OSS too. Here’s the UK government on Github.
Here’s the source for React and here’s Node. Here’s the source for the engine that implements JavaScript inside Chrome.
Here’s the source for MDN that we make you look up all the time. And for Visual Studio Code, the editor you’re using right now.
Here’s the source code for the Linux operating system: https://github.com/torvalds/linux
Notice how that’s someone’s personal GitHub account? That’s because Linux started out as a personal project; it was made by that person, Linus Torvalds. He’s right here on Github too. This is where tech lives. And you are a part of it now. You can contribute to it. You can make it better.
You can make it yours.
This is the power and the opportunity of Open Source. You don’t actually need credentials, or experience or a fancy education or a job to participate in Open Source. Your code is what is evaluated in this world. If your Pull Request is clear and useful enough to others, it will be merged. If it’s not, it won’t.
OSS isn’t a perfect world of fairness and impartiality - it’s still made by imperfect human beans - but it’s an open world, and this opportunity is powerful.
You don’t have to invent Linux to contribute to OSS. In fact, the reason OSS is so powerful is that it is developed by millions of people, each doing a small part. We are more like bees, busying ourselves with our own little tasks, but together we make something beautiful.
Let’s go on an adventure. Let’s find some Open Source projects to contribute to.
- Define Open Source
- Fork two Open Source projects
- Contribute to an Open Source project
Requirements
This is a OSS Project! You can contribute to it by following these steps:
- Fork this repository
- Create a branch called
add-yournameherewhere yournamehere is your own name - Add your name to the list of contributors
- Commit your changes
- Push your changes to your fork
- Open a Pull Request
- Meet the requirements of the project, as defined by the maintainer
- Have your Pull Request merged
- Find an Open Source project that you can make a useful contribution to
- A good place to start is First Timers Only
- Fork the project and make a contribution. It might be documentation, it might be code, it might be a bug fix, it might be a feature request. It doesn’t matter. Just make a useful contribution.
- Remember, you are a developer. You can contribute to any project, not just CYF projects. Represent us with honour.
Acceptance Criteria
- I have forked this repository
- I have created a branch called
add-yournameherewhere yournamehere is your name - I have added my name to the list of contributors
- I have committed my changes
- I have pushed my changes to my fork
- I have opened a Pull Request from my branch on my fork to this repository’s
mainbranch - I have met the requirements of the project, as defined by the maintainer
Resources
🔗 Gilded Rose Kata
The Gilded Rose
Gilded Rose kata in JavaScript with Jest
Introduction
The Gilded Rose is a refactoring kata created by Terry Hughes (originally published here in 2011) and popularised by Emily Bache. The purpose of the kata is to experience working with a legacy codebase in the face of new requirements. You can watch Emily’s video about the kata, “Why Developers LOVE The Gilded Rose Kata”, on YouTube.
The implementation (src/gilded_rose.js) is taken from her repo collecting starting point implementations across multiple languages and frameworks, generously released under the MIT license, and the integration test (__tests__/integration.test.js) is ported from the TextTest suite in the same repository.
Installation
- Ensure you have Node.js and NPM installed (any currently-supported LTS should be fine; Jest 29 requires Node
^14.15 || ^16.10 || >= 18, the tests require^14.18 || >=16) - Clone the repo
- Run
npm cito install the dependencies (the implementation is pure JS, but the tests require Jest) - Run
npm testto check that it’s all working - Read the requirements and set to work!
🔗 Github Activity
Github Activity Project
Let’s play with grabbing some data from an API and displaying it on a website. We will be using the the Fetch API to make requests to the Github Search API and the Web Components API to display the data we get back. Let’s go!
- Explain how components are used in web development
- Adapt an existing web component to show your own data
- Extend this web component to present more data from the Github Search API
- Create a new web component that presents data from the Github Search API
Requirements, Steps, and Acceptance Criteria
Open the
index.htmlfile in your browser and you should see a grid of badges showing pull requests to the Syllabus repo. This grid is a web component that is defined in thepull-badges.jsfile. If you’ve already done the Codewars API project, this will look very familiar.Find the js module in the
index.htmlfile that linkspull-badges.js. This module defines a new HTML element called<pull-badges>, which you can now use just like any other HTML element. Notice how we can select this and style it with CSS like any other HTML element.Open the
pull-badges.jsfile. The list of badges is defined as a class that extends theHTMLElementclass. TheconnectedCallbackmethod is called when the page loads. This callback is where we (a) make the request to the Github Search API and then (b) render the data we get back.Change the
repovariable in thepull-badges.jsfile to a different repo on the CodeYourFuture org. What about1000-Paper-Cranes? Or what about this repo?Look at the API directly in your browser. It’s just a URL - you can look at it. (Install a JSON viewer extension for your browser if you don’t have one already. This will make it easier to read the data.)
Now try adding some more data to the badges. There are lots of other possible data we could display in the badge. Look through the Github Search API docs to help you. Maybe you will decide to break this component down into a badge component and a list component.
Now try creating a new web component that displays some data from a Github API. There are absolutely loads of Github APIs you can play with. (Some require authentication but many are public.) Use the
pull-badges.jsfile as a template for how to define a web component. You can use theindex.htmlfile to test your new component. (You could use this component in your portfolio website.)
Remember: keep it simple!
You don’t need to make a full web app. Just make a web component that displays some data from a GitHub API. Explore and get creative. If your component gets complicated, break it down into smaller components and compose them on the page, just as you would do with any other HTML elements.
Acceptance Criteria
- I have adapted an existing web component to show my own data
- I have extended this web component to present more data from the Github Search API
- I have created a new web component that presents data from the Github Search API in my own way
- I have tested my page with Lighthouse and my Accessibility score is 100
- I have opened a pull request with my changes to this repo
- I have explained how components are used in web development, in my own words, in my pull request message
Resources
Think of Fetch as your new puppy. Send fetch to an API and tell it to fetch you some data. Fetch! Then await your response. Fetch will dash back to you, panting, with the data you requested, or an error if something went wrong. This is your response. Stuff that response into a variable and do whatever you want with it.
=> https://developer.mozilla.org/en-US/docs/Web/API/fetch
This is how your Pull Requests are tracked automatically by CYF. We use the Fetch API to make requests to the Github API and then we record your pull requests against a list of repos in the trainee tracker. You could make your own tracker if you wanted to!
What is a web component?
If you want HTML to do something that it doesn’t do by default, you can write your own custom HTML element. This is called a web component.
…What is a component?
A component is a reusable, self-contained piece of code. Components are like lego blocks you can build websites with. Most websites are made by “composing” components in this way.
Are all websites built with web components?
Nope! React components are written with React, Twig components are written with Twig, etc. Components are not a specific technology, they are a concept. Everywhere in programming we look to break down our code into small, reusable pieces. Web components are a way to do this with HTML.
Do I need to use fetch to use web components?
Not at all.
Web components are a way to define your own HTML elements. That element does not need to dynamically load data. Fetch is a way to make requests to an API. We happen to be learning fetch and web components together but they are not dependent on each other.
🔗 JS Slideshow
Challenge: “Image Carousel”
Challenge Overview
Make a website which allows the user to navigate a set of images (first manually, then with an auto-playing slideshow).
Level 1 Challenge
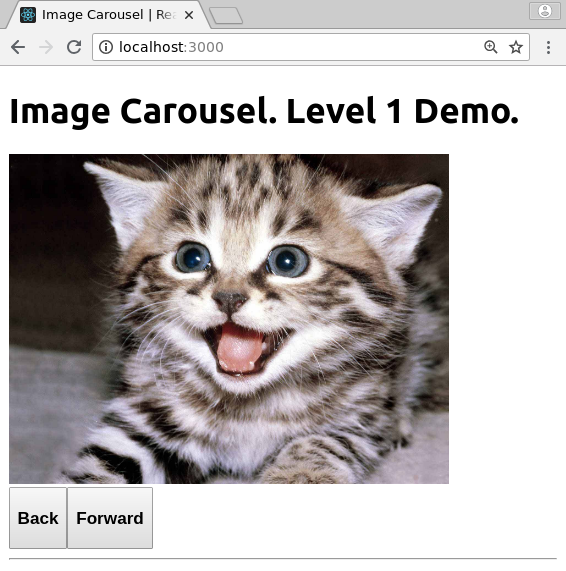
Make forward and back buttons to move manually in that direction through a list of at least 4 images.
(e.g. When the user presses forward once, the display should move ONCE to the next image.)
You can use any images.
You can store the images within your app or you can use links to images hosted elsewhere (“hotlinking”).
Unsplash is a good source of images for this challenge.
Level 1 challenge screenshot example.
Level 2 Challenge
Make auto-forward and auto-back buttons to automatically move in that direction through the list of images.
Here’s a screenshot example from a completed level 2 challenge.

Try to finish the rest by yourself
If you want a harder challenge, don’t read the rest of this document but instead try to build the app by yourself.
If you want hints, then you will find some below.
Suggested approach
Here’s one approach you might take to building this app.
Task: Design your layout on paper
Design your layout on paper. Keep it very simple - this is a JavaScript challenge, not a CSS challenge.
Use a layout that will be ok on a phone (but don’t spend time on responsive design).
Keep this drawing around for reference later.
Task: Convert your layout to HTML
Convert the drawing to HTML (on codepen or elsewhere) and check the buttons appear correctly.
DON’T add any CSS or extra markup to make it look good just now. That will only make it more difficult for you to think about your app during development.
Task: Make the buttons work
Make your buttons work to navigate forwards and backwards, manually.
Task: more buttons - automated slideshow
Add the following buttons:
- auto-forward
- stop
- auto-backwards
These should allow automatic navigation through the images, say every 5 seconds.
End of basic challenge!
Congratulations, you’ve finished the basics!
- Make sure you can access it and play with it on a smartphone!
- Celebrate!
Extra Task for Slideshow
Optional: Add UI for delay time
Add UI so that the user can specify how long to wait between images.
Advanced Challenge: Make it look good
Now is a good time to make it look good with CSS, colour, typography, images, and creativity. Maybe you could ask someone to collaborate with you on those aspects.
🔗 Lab React Components

LAB | React Training
This exercise allows you to practice and apply the concepts and techniques taught in class.
Upon completion of this exercise, you will be able to:
- Create and render components with multiple props.
- Use props to pass data to components and display the data received through props within the components
- Use inline styles to modify the appearance of components
- Use operators
?and&&to conditionally render content - Use the
useStatehook to create state variables and add state to React components. - Use state variable setter functions to update state and trigger component re-render.
- Create event handler functions to handle user interactions and browser events.
- Create controlled components to manage the form inputs.
- Apply the “Lifting State Up” approach to share the state between components.
- Pass functions as props from a parent component to a child component.
Introduction
The purpose of this exercise is to practice the core React concepts such as: creating components, passing data through props, working with state, rendering lists, and working with forms (controlled components).
To see the expected result for each iteration, refer to the solution example: React Training - solution.
Setup
- Fork this repo
- Clone this repo
$ cd lab-react-training
$ npm install
$ npm start
Submission
Upon completion, run the following commands:
git add .
git commit -m "done"
git push origin master
Create a Pull Request so that your TAs can review your work.
Instructions
Iteration 0 | Components folder
Inside of the src/ folder, create a new folder named components.
Use the components folder to store all the components that you create in the following iterations.
Iteration 1 | Component: IdCard
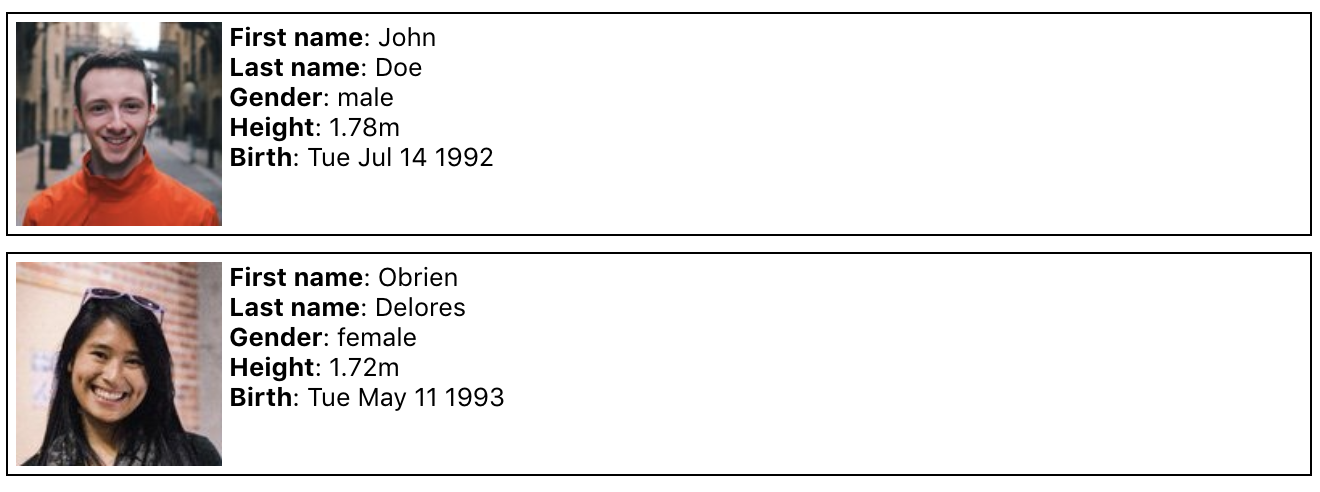
Create and render an IdCard component with 6 props:
lastName: A stringfirstName: A stringgender: A string,'male'or'female'height: A numberbirth: A datepicture: A string
Example:
<IdCard
  lastName='Doe'
  firstName='John'
  gender='male'
  height={178}
  birth={new Date("1992-07-14")}
  picture="https://randomuser.me/api/portraits/men/44.jpg"
/>

<IdCard
  lastName='Delores '
  firstName='Obrien'
  gender='female'
  height={172}
  birth={new Date("1988-05-11")}
  picture="https://randomuser.me/api/portraits/women/44.jpg"
/>
Expected Output:
Iteration 2 | Component: Greetings
Create a Greetings component with 2 props:
lang: A string that can have values:"de","en","es"or"fr"children: A text
The component should display a greeting text in the chosen language.
Example:
<Greetings lang="de">Ludwig</Greetings>
<Greetings lang="fr">François</Greetings>
Expected Output:

Iteration 3 | Component: Random
Create a Random component with 2 props:
min: A numbermax: A number
The component should display a random integer in the range between the min and the max number.
Example:
<Random min={1} max={6}/>
<Random min={1} max={100}/>
Expected Output:

Iteration 4 | Component: BoxColor
Create a BoxColor component that displays a rectangle with a background color based on props. For this, you will need to add inline styles (documentation).
The component should take 3 props:
r: A number between0and255representing the amount of redg: A number between0and255representing the amount of greenb: A number between0and255representing the amount of blue
Example:
<BoxColor r={255} g={0} b={0} />
<BoxColor r={128} g={255} b={0} />
Expected Output:
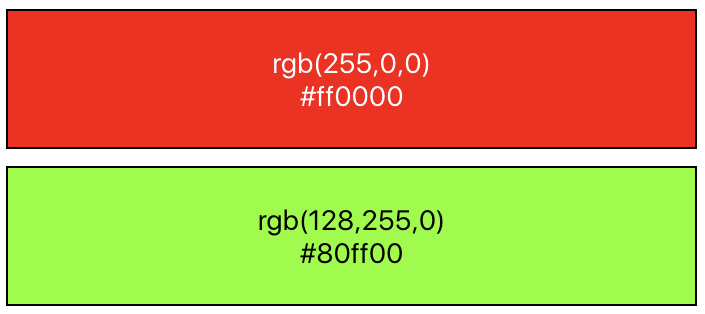
As a bonus, you can also display the hex values of the color (e.g., #ff0000 for red).
Iteration 5 | Component: CreditCard
Create a CreditCard component that displays a rectangle with the information coming from the props.
The component should take 8 props:
type: A string that can be"Visa"or"Master Card"number: A string that is the number of the credit card. For security reasons, you should only display the 4 last digits 😉expirationMonth: A number that represents the month, between 1 and 12expirationYear: A number that represents the yearbank: A string that represents the name of the bankowner: A string that represents the name of the ownerbgColor: A string for the background color of the cardcolor: A string for the text color of the card
Take your time to make the component look as close to the expected output as possible. You’ll probably want to use flexbox.
Example:
<CreditCard
  type="Visa"
  number="0123456789018845"
  expirationMonth={3}
  expirationYear={2021}
  bank="BNP"
  owner="Maxence Bouret"
  bgColor="#11aa99"
  color="white"
/>

<CreditCard
  type="Master Card"
  number="0123456789010995"
  expirationMonth={3}
  expirationYear={2021}
  bank="N26"
  owner="Maxence Bouret"
  bgColor="#eeeeee"
  color="#222222"
/>

<CreditCard
  type="Visa"
  number="0123456789016984"
  expirationMonth={12}
  expirationYear={2019}
  bank="Name of the Bank"
  owner="Firstname Lastname"
  bgColor="#ddbb55"
  color="white"
/>
Expected Output:

Iteration 6 | Component: Rating
Create a Rating component that displays 5 stars. Depending on the value received, some stars should be empty (☆), and some should be filled (★).
The component should take 1 prop:
children: A number between0and5. The value can be a floating-point number. If the number received is3.9, the component should display 4 stars.
Example:
<Rating>0</Rating>
<Rating>1.49</Rating>
<Rating>1.5</Rating>
<Rating>3</Rating>
<Rating>4</Rating>
<Rating>5</Rating>
Expected Output:

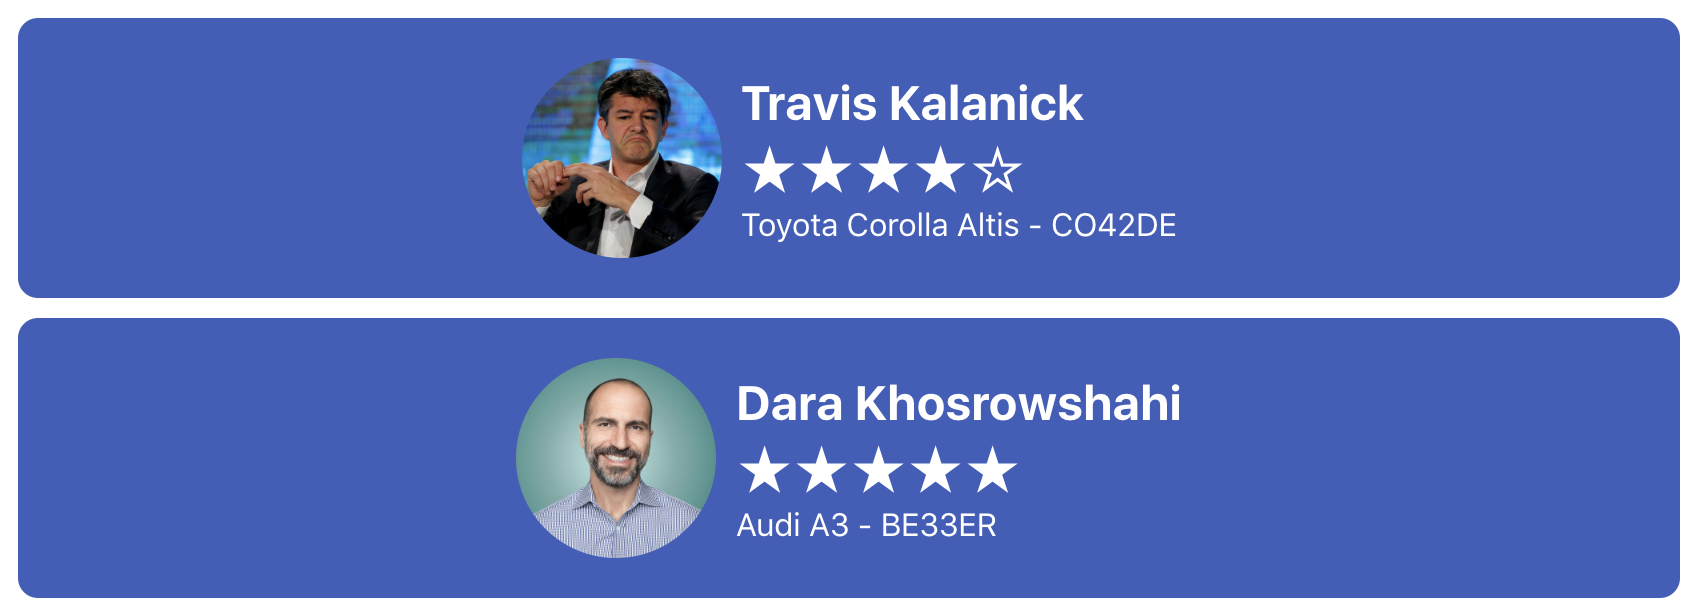
Iteration 7 | Component: DriverCard
Create a DriverCard component that displays a rectangle with content based on the received props.
The component should take 4 props:
name: A stringrating: A number between0and5. The value can be a floating point number.img: A stringcar: An object with propertiesmodelandlicensePlate.
Example
<DriverCard
  name="Travis Kalanick"
  rating={4.2}
  img="https://si.wsj.net/public/resources/images/BN-TY647_37gql_OR_20170621052140.jpg?width=620&height=428"
  car={{
    model: "Toyota Corolla Altis",
    licensePlate: "CO42DE"
  }}
/>

<DriverCard
  name="Dara Khosrowshahi"
  rating={4.9}
  img="https://ubernewsroomapi.10upcdn.com/wp-content/uploads/2017/09/Dara_ELT_Newsroom_1000px.jpg"
  car={{
    model: "Audi A3",
    licensePlate: "BE33ER"
  }}
/>
Expected Output:
Iteration 8 | State: LikeButton
Create a LikeButton component that displays a button with the initial text "0 Likes". With each click, the number of Likes should increase.
As a bonus, implement the background color change on each click. You can use the following array of colors: ['purple','blue','green','yellow','orange','red']
Example:
<LikeButton />
Expected Output:

Iteration 9: State: ClickablePicture
Create a ClickablePicture component that displays a picture. On each click, the picture should toggle between the two images passed through the props.
Example:
<ClickablePicture
  img='maxence.png'
  imgClicked='maxence-glasses.png'
/>
Expected Output:

PS: If you want to use your picture instead, you can create it using this picture: http://www.stickpng.com/assets/images/584999937b7d4d76317f5ffd.png 😎
Iteration 10 | State: Dice
Create a Dice component that displays a picture with the random dice value (example: '../assets/images/dice3.png').
Every time the user clicks on the component, it should:
- First, display an empty picture (
'../assets/images/dice-empty.png') - 1 second later, display a new random picture (example:
'../assets/images/dice6.png').
Example:
<Dice />
Expected Output before the click:

Expected Output immediately after the click:

Expected Output 1 second after the click:

Iteration 11 | State: Carousel
Create a Carousel component that displays an image and two buttons (Left and Right), which change the picture on each click, respectively.
The component should take 1 prop:
images: An array of strings. Each string should be an image URL.
Example:
<Carousel
  images={[
    'https://randomuser.me/api/portraits/women/1.jpg',
    'https://randomuser.me/api/portraits/men/1.jpg',
    'https://randomuser.me/api/portraits/women/2.jpg',
    'https://randomuser.me/api/portraits/men/2.jpg'
  ]}
/>
Expected Output:

Iteration 12 | List and Keys | NumbersTable
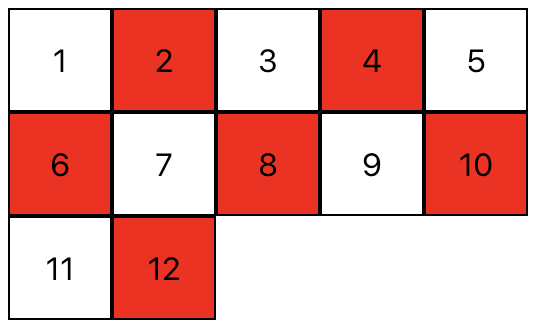
Create a NumbersTable component that displays a list of numbers between 1 and the limit. Even numbers must be colored in red.
The component should take 1 prop:
limit: A number.
Example:
<NumbersTable limit={12} />
Expected Output:
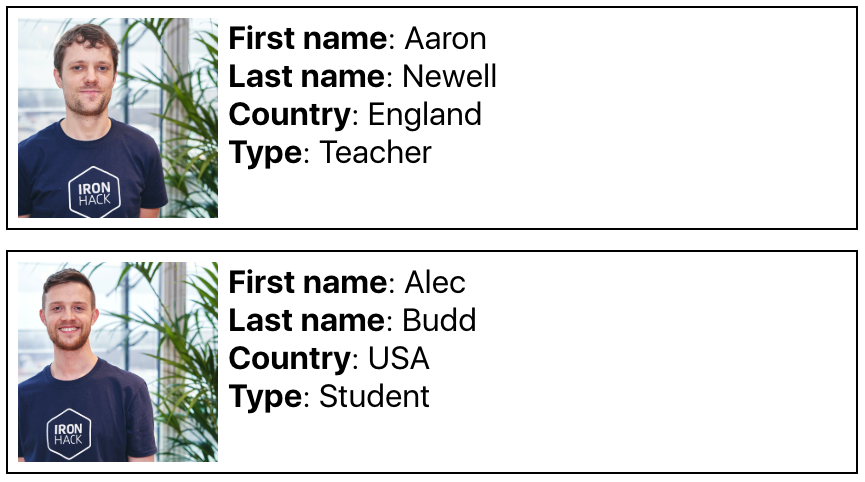
Iteration 13 | List and Keys - FaceBook (Simple)
Create a FaceBook component that displays the list of all profiles coming from the file src/data/berlin.json. Remember to import the json data in the component:
import profiles from './data/berlin.json';
Example:
<FaceBook />
Expected Output: (you should see about 28 profiles)
Iteration 14 | List and Keys - FaceBook (Advanced)
Update your FaceBook component and add a button for each country the students come from; Each student object has a country property. When the user clicks on the button with the country name (example: USA), add a blue background to all the profiles where the country is the one selected.
Example:
<FaceBook />
Expected Output: (note: part of the content in the screenshot was cropped)
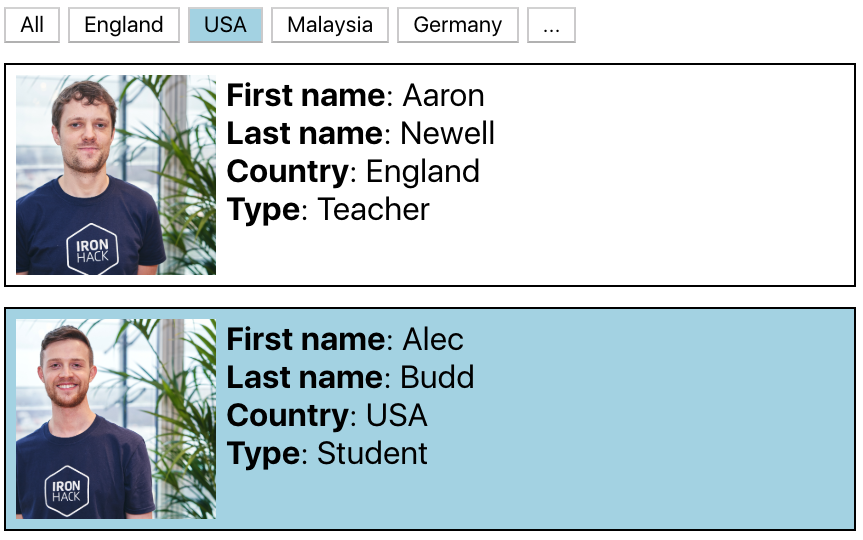
Bonus:
- By default, only display the picture. Then, when a user clicks on a picture, display more information
- Add sort buttons
- Add a search input
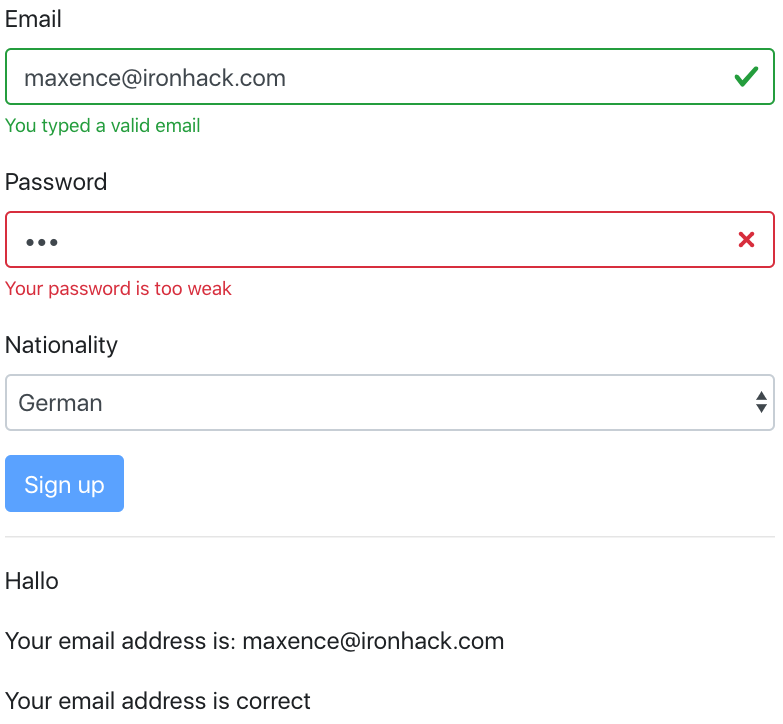
Iteration 15 | Form - SignupPage
Create a SignupPage component with the following elements:
An
inputof type"email"(bonus: make the input green/red when the email is valid/invalid)An
inputof type"password"(bonus: make the input green/red when the password is strong/weak)A
selectinput, used for selecting a nationality, with possible options/values:"en","de","fr"A paragraph displaying
"Hello","Hallo"or"Bonjour"based on the selected nationalityA text “Your email is john@doe.com”
For this, you will need 3 state variables:
emailpasswordnationality
If you want to include Bootstrap with Reactstrap, you should run
npm install reactstrap bootstrap
And add the following line in src/index.js
import 'bootstrap/dist/css/bootstrap.min.css';
Example
<SignupPage />
Output
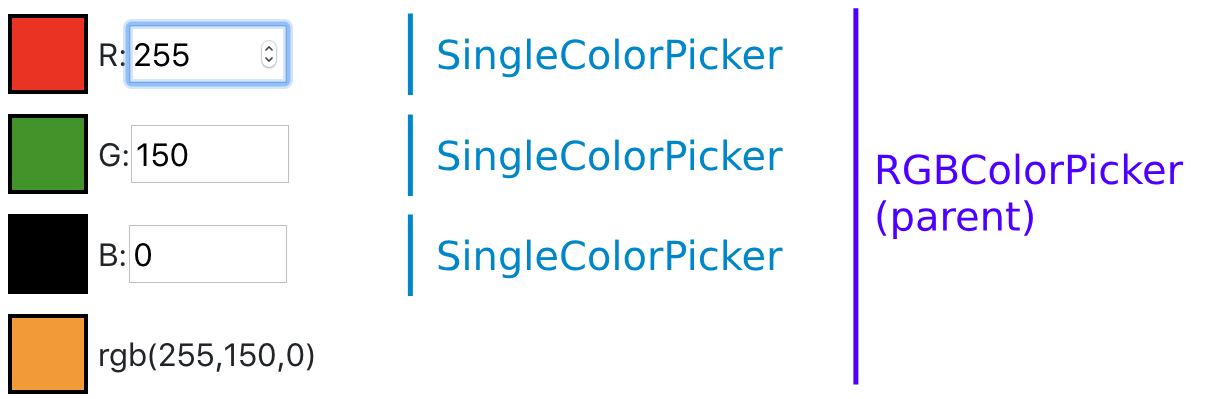
Iteration 16 | Lifting State Up - RGBColorPicker
Create 2 components:
The
RGBColorPickercomponent, that displays a square with an rgb color coming from the state. The component should have the following state variables:rValue: A number between0and255, representing the amount of redgValue: A number between0and255, representing the amount of greenbValue: A number between0and255, representing the amount of blue
The
SingleColorPickercomponent should have an input field of type"number", and allow the user to select a number between0and255.The component should take 3 props:
color: A string that is either"r","g"or"b"value: A number between0and255onChange: A method that is triggered when the input is changed
The RGBColorPicker should render 3 SingleColorPicker components and send the state values to them.
Example:
<SingleColorPicker
  color="r"
  value={rValue}
  onChange={ () => { /* ... */ }  }
/>

<SingleColorPicker
  color="g"
  value={gValue}
  onChange={ () => { /* ... */ }  }
/>

<SingleColorPicker
  color="b"
  value={bValue}
  onChange={ () => { /* ... */ }  }
/>
Expected Output
Happy coding! :heart:
🔗 Mailing List REST API
Mailing List REST API
Credit: This challenge was created by Techtonica. You can find the original on the Techtonica Curriculum.
Previous Knowledge & Difficulty
To complete this challenge you should be able to
- Create a
NodeApplication - Use
Expressto setup endpoints - Understand what a
GET&PUTRequest are and how to use them usingFetch
This challenge is rated at Easy to Medium.
Mailing List REST API
Tools
You should create an Express app. All of this can be in-memory, no database or file storage needed.
Data
The data consists of mailing lists which have a name and an array of member email addresses.
{
  "name": "staff",
  "members": ["talea@techtonica.org", "michelle@techtonica.org"]
}
Routes
Index
Route
/lists - fetch all the existing list names
Response
- 200 with a JSON body of all the existing list names
- 200 and empty array if none exist (not a 404)
Response Body
["staff", "cohort-h1-2020"]
Example Express Code
const lists = new Map();
// see https://developer.mozilla.org/en-US/docs/Web/JavaScript/Reference/Global_Objects/Map

// add some fake data

app.get("/lists", (req, res) => {
  const listsArray = Array.from(lists.keys()); // Why is this like this? Try it out in your console.
  res.send(listsArray);
});
GET single list
Route
/lists/:name - get list by name, e.g. /lists/staff
Response
- 200 with a JSON body (name and member emails) of the given list
- 404 if not found
Response Body
{
  "name": "staff",
  "members": ["talea@techtonica.org", "michelle@techtonica.org"]
}
While the frontend code is correct, the backend is not set up and will error (specifically POST, PUT and DELETE). Do not worry if you can not make it work, please follow along with the code and make sure you understand what is going on. The goal of this exercise is for you to understand how to set up routes so don’t worry too much about the logic yet, we will get to that in future lessons.
DELETE single list
Route
/lists/:name - delete list by name
Response
- 200 if successfully deleted
- 404 if not found to delete
Response Body
None needed
PUT - update single list
Path
/lists/:name - add or update a list with the given name
Request Body
{
  "name": "my-new-list",
  "members": ["me@me.com"]
}
Response
- 200 if it updated a list that already existed
- 201 if it created a new list
Response Body
None
Stretch 1
What if the name in the path doesn’t match the one in JSON body?? Sounds like an error case to me. Detect this case and pick an appropriate status code. (hint: if the client did something wrong in the request, it’ll be 4xx)
Testing
Use Postman to test retrieving, saving, and deleting mailing lists using your API.
Stretch 2
Some would say the more REST-ful way to manage the members of the list is to make them into a resource.
After creating your pull request in this coursework repo, try this challenge!
GET /lists/:name/members=> return array of emails only for a listPUT /lists/:name/members/:email=> make the supplies email a member of the listDELETE /lists/:name/members/:email=> remove the supplied email as a member of the list
Sidebar PUT vs. POST
API’s often use POST and PUT for updates. They have slightly different meanings. This side-by-side comparison can be helpful but don’t get too hung up on that at this stage.
POST /lists/:name/memberswith a body containing an email will add it to the list, even if it’s already there
🔗 P5 Minimal
(Hello! Remember, once you’ve forked this project, this file is YOURS to delete or re-write as you like!)
A minimal starting template for a p5.js “sketch”, for CYF students
What is this?
This is a minimal p5js project for CYF students who have finished the fantastic Khan Academy intro to js: drawing and anim course.
It’s just a .html file and a .js file.
What can I do with it?
You can fork this repo to start working on your own p5.js projects.
Perhaps use it to migrate some of your favourites from your Khan Academy work (and give them their own home by deploying on netlify or github pages).
What does it look like when it runs?
To start with, it will look like this: https://codeyourfuture.github.io/p5js-minimal/
Make it cooler!
My khan academy (processing.js) code doesn’t work in p5.js!
Don’t panic, almost all of your code will work fine.
🔗 Record a Goose
Learning Objectives
Record a goose sighting
What to do
Go to the ‘Record a goose sighting’ exercise
This is a fictional service, to help you record any sightings of geese (geese are awesome). It’s using the GOV.UK Design system, which are WCAG 2.1 AA compliant, and benefits from hundreds of hours of work and testing. However, even if you’re using a Design System, stuff can still go wrong…
There are places where the Design System is misused, misimplemented or misunderstood. This has caused accessibility issues, which range across code, design and content - because accessibility issues can be introduced by all of these disciplines. As such, anyone is welcome to have a go and use this as an exercise!
How to use this
The task is to find as many of the accessibility issues in this site as you can in ~20 minutes.
There is a worksheet, and there is also a list of answers - but give it the full 20 minutes before you look at the answers first, if you’re working through this alone!
If you are running this as a group workshop, there is an answerless ‘Record a goose sighting’ exercise, that you can use with attendees. This prevents you from finding answers before you’re ready to go through them as a group!
What testing tools to use
I would recommend working through the site in the following order:
- Can you access everything by pressing the tab key?
- Does WAVE show any errors, or highlight any issues with the HTML structure?
- Does the colour contrast tab on WAVE throw up any errors?
- Install and run Accessibility Insights. What advice does it give you?
Government Digital Services have recently published how to conduct a basic accessibility audit, which is worth a look at too.
Testing like this is a good way to identify basic accessibility issues. It would not replace an audit against WCAG 2.1 to level AA, and its ~50 criteria. Why still do it? These are tests that are quick to run, and it’s easier to fix accessibility issues at the start, rather than the end.
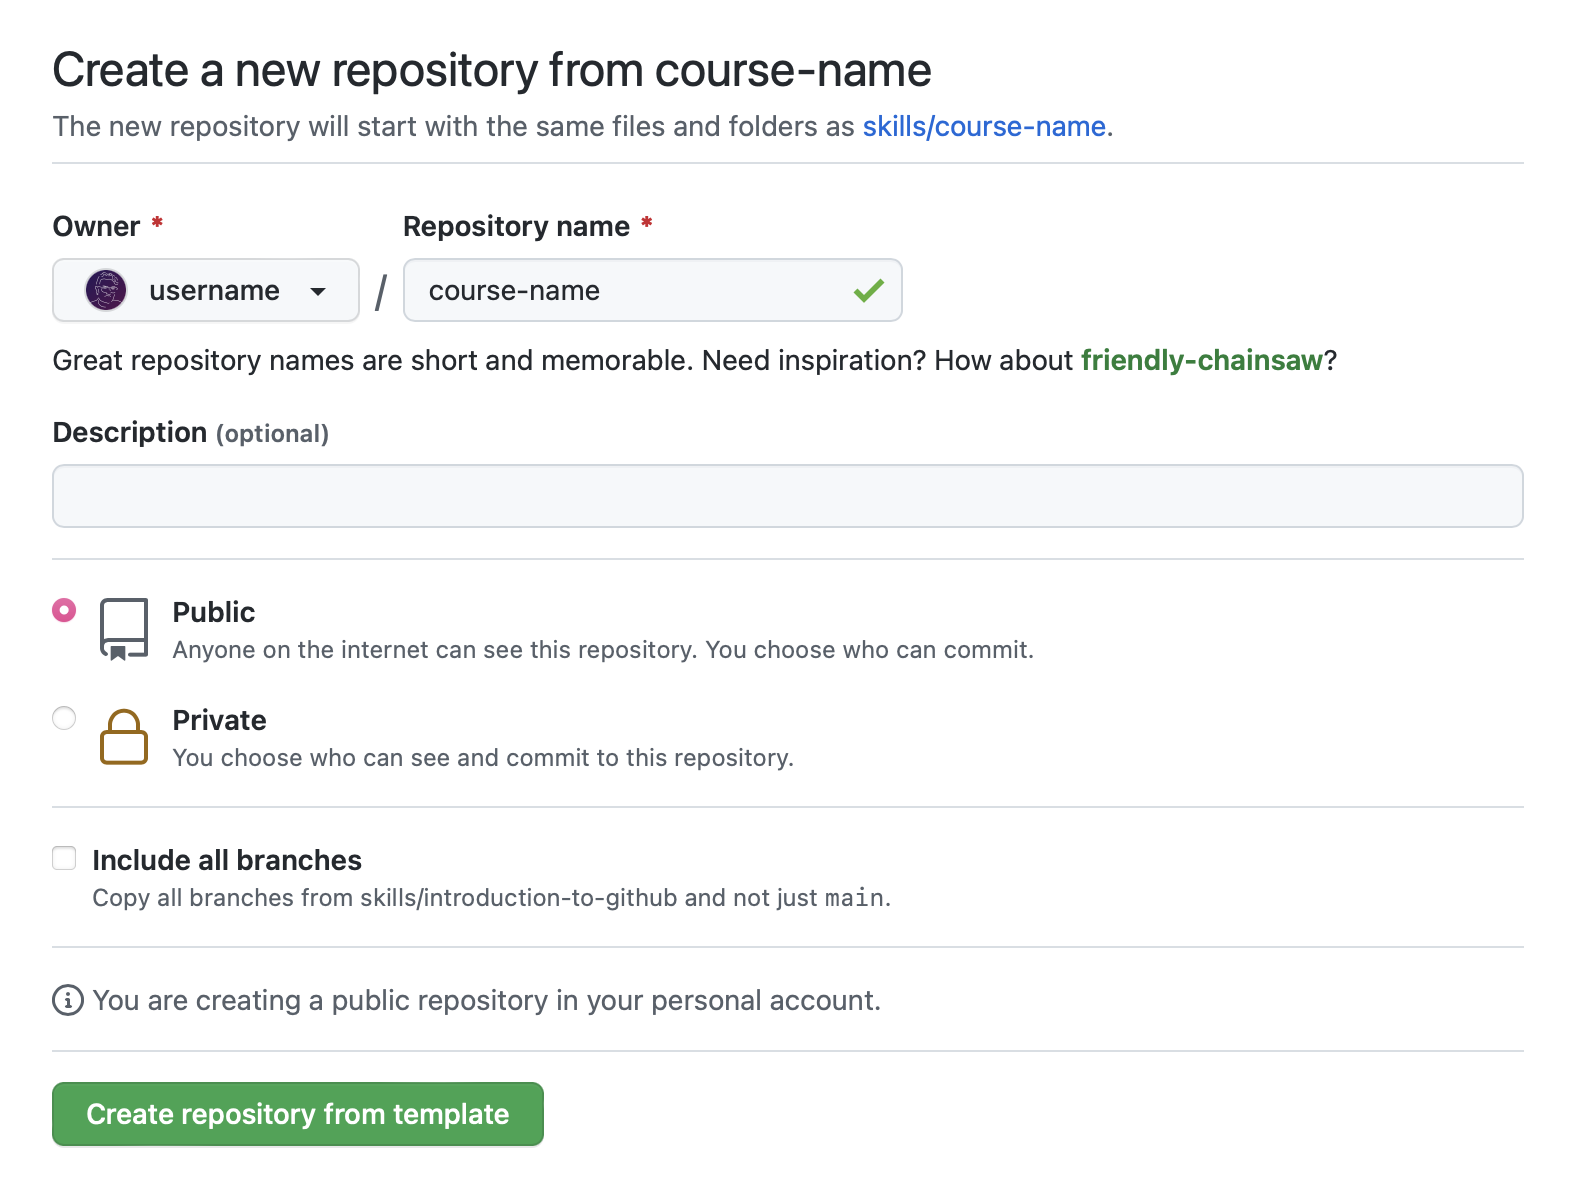
🔗 Resolve Merge Conflicts
Resolve merge conflicts
Learn why conflicts happen and how to resolve them.
Welcome
Merge conflicts happen when two people make changes to the same file on GitHub—a common occurrence when you’re working with others. While resolving differences might involve some discussion, merge conflicts don’t have to be scary. This course guides you through the steps to finding the best merge conflict solution, so your team can keep building.
- Who is this for: New developers, new GitHub users, users new to Git, students, managers, teams.
- What you’ll learn: What merge conflicts are, how you resolve merge conflicts, how to reduce merge conflicts.
- What you’ll build: We’ll work with a short Markdown resume file in this course.
- Prerequisites: We recommend taking Introduction to GitHub prior to this course.
- How long: This course takes less than 30 minutes to complete.
In this course, you will:
- Create a pull request
- Resolve a merge conflict
- Create a merge conflict
- Merge your pull request
How to start this course

- Right-click Start course and open the link in a new tab.
- In the new tab, most of the prompts will automatically fill in for you.
- For owner, choose your personal account or an organization to host the repository.
- We recommend creating a public repository, as private repositories will use Actions minutes.
- Scroll down and click the Create repository button at the bottom of the form.
- After your new repository is created, wait about 20 seconds, then refresh the page. Follow the step-by-step instructions in the new repository’s README.
Get help: Post in our discussion board • Review the GitHub status page
© 2023 GitHub • Code of Conduct • MIT License
🔗 SASS in React
Getting Started with CYF SASS in React
Deployed here: https://cyf-sass-in-react.netlify.app/
This project was bootstrapped with Create React App.
It has minimal changes from the defaults, just one extra package: “sass”, and engines.
This is a front end sample, so it doesn’t have a database. It’s just using mock JSON to populate the view, from data/cards.json
It is extensively commented. Go through the /theme directory to look at the core pieces:
- type
- colours
- spacing
- utilities
Then look at the component scss.
There are suggestions for improvements and iterations. How can you develop it further?
Available Scripts
In the project directory, you can run:
npm start
Runs the app in the development mode.
Open http://localhost:3000 to view it in your browser.
The page will reload when you make changes.
You may also see any lint errors in the console.
npm test
Launches the test runner in the interactive watch mode.
See the section about running tests for more information.
npm run build
Builds the app for production to the build folder.
It correctly bundles React in production mode and optimizes the build for the best performance.
The build is minified and the filenames include the hashes.
Your app is ready to be deployed!
See the section about deployment for more information.
npm run eject
Note: this is a one-way operation. Once you eject, you can’t go back!
If you aren’t satisfied with the build tool and configuration choices, you can eject at any time. This command will remove the single build dependency from your project.
Instead, it will copy all the configuration files and the transitive dependencies (webpack, Babel, ESLint, etc) right into your project so you have full control over them. All of the commands except eject will still work, but they will point to the copied scripts so you can tweak them. At this point you’re on your own.
You don’t have to ever use eject. The curated feature set is suitable for small and middle deployments, and you shouldn’t feel obligated to use this feature. However we understand that this tool wouldn’t be useful if you couldn’t customize it when you are ready for it.
Learn More
You can learn more in the Create React App documentation.
To learn React, check out the React documentation.
Code Splitting
This section has moved here: https://facebook.github.io/create-react-app/docs/code-splitting
Analyzing the Bundle Size
This section has moved here: https://facebook.github.io/create-react-app/docs/analyzing-the-bundle-size
Making a Progressive Web App
This section has moved here: https://facebook.github.io/create-react-app/docs/making-a-progressive-web-app
Advanced Configuration
This section has moved here: https://facebook.github.io/create-react-app/docs/advanced-configuration
Deployment
This section has moved here: https://facebook.github.io/create-react-app/docs/deployment
npm run build fails to minify
This section has moved here: https://facebook.github.io/create-react-app/docs/troubleshooting#npm-run-build-fails-to-minify
🔗 Skills Review Pull Requests
Review pull requests
Collaborate and work together on GitHub.
All great projects start with collaboration. Pull requests are the foundation of teamwork on GitHub — and pull request reviews give you the ability to work together and discuss changes specific to a pull request by commenting, requesting changes, or approving.
- Who is this for: Developers, new GitHub users, users new to Git, students, managers, teams.
- What you’ll learn: When and how to request a review; how to provide a review of someone else’s pull request.
- What you’ll build: We’ll be reviewing a pull request for a simple game.
- Prerequisites: We assume you are familiar with creating branches, commits, and pull requests—you can learn this in our Introduction to GitHub course.
- How long: This course is five steps long and takes less than 30 minutes to complete.
How to start this course
- Right-click Start course and open the link in a new tab.

- In the new tab, follow the prompts to create a new repository.
- For owner, choose your personal account or an organization to host the repository.
- We recommend creating a public repository—private repositories will use Actions minutes.
- After your new repository is created, wait about 20 seconds, then refresh the page. Follow the step-by-step instructions in the new repository’s README.
Welcome to “Review pull requests”! :wave:
Let’s get started by opening a pull request.
What is a pull request?: Collaboration happens on a pull request. The pull request shows the changes in your branch to other people. This pull request is going to keep the changes you just made on your branch and propose applying them to the main branch.
:keyboard: Activity: Create a pull request
- Click on the Pull requests tab in your repository.
- Click New pull request.
- In the base: dropdown, make sure main is selected.
- Select the compare: dropdown, and click
update-branch. - Click Create pull request.
- Enter a title for your pull request:
Update the game over message. - Enter a description for your pull request:
Update the game over message so people know how to play again! - Click Create pull request.
Next, wait about 20 seconds for actions to run, then refresh this course’s README (the one you’re following instructions from) and a GitHub Action will automatically close this step and open the next one.
Great job opening that pull request! :wave:
What is a pull request review?: Reviewing a pull request is an opportunity to examine another contributor’s changes and give them feedback. It’s an awesome opportunity to learn more about how the project works and how others solve problems.
The best way to get a review is to ask for one. On GitHub, you can ask someone to review a pull request by assigning them as a reviewer or assignee. If you are not ready for review, consider creating a draft pull request instead.
:keyboard: Activity: Assign yourself
- Open the pull request you just created.
- Under Assignees on the right side of the screen, add yourself.
Because you created the pull request, you can’t assign yourself as a reviewer, but feel free to assign a friend as a reviewer instead to see how it works :smile:
Next, wait about 20 seconds for actions to run, then refresh this course’s README (the one you’re following instructions from) and a GitHub Action will automatically close this step and open the next one.
You assigned yourself! :tada:
Pull request reviews ensure quality and maintain momentum of changes to your project.
When reviewing a pull request:
- Review the title and body of the pull request, and possibly any associated issue, to understand the intended change.
- Review the diff, the comparison of the proposed code, in the context of the whole project.
- For most things, try out the proposed change. Check if the actual change matches the intention. Find the repository’s contributing guide to find out how to review the changes.
In your review comments:
- Identify potential issues, risks, and limitations.
- Suggest changes and improvements.
- Share awareness of upcoming changes that the pull request doesn’t account for.
- Ask questions to verify shared understanding.
- Highlight what the author did well and should keep doing.
- Prioritize the most important feedback.
- Be concise and provide meaningful detail.
- Treat the pull request author with kindness and empathy.
When an approval or request for changes is not yet needed, consider using comments. An approval lets the author know you believe the pull request is safe to merge. Requesting changes lets the author know you believe the pull request is not ready to merge.
:keyboard: Activity: Leave a review
- On the pull request, click Files changed.
- Click Review changes.
- Add a comment with your initial thoughts on the pull request.
- Select comment. You won’t be able to approve or request changes to your own pull request.
- Click Submit review.
Next, wait about 20 seconds for actions to run, then refresh this course’s README (the one you’re following instructions from) and a GitHub Action will automatically close this step and open the next one.
Nice work reviewing that pull request :sparkles:
Now that you have explored the different ways you can review a pull request it is time to learn how to use suggest changes.
What is suggest changes?: This feature enables you to recommend a change to a pull request that the author can commit with the push of a button.
:keyboard: Activity: Suggest changes
- On the pull request, click Files changed.
- Find the
index.htmlchanges. - Hover your cursor next to the line numbers on the left side of the page.
- Click the blue plus icon.
- After the comment form appears, click the Add a suggestion button.
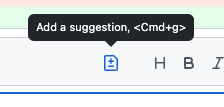
- Edit the suggestion.
- Click Add a single comment.
Next, wait about 20 seconds for actions to run, then refresh this course’s README (the one you’re following instructions from) and a GitHub Action will automatically close this step and open the next one.
Nicely done suggesting changes! :partying_face:
Now let’s see how easy it is to apply your suggestion.
:keyboard: Activity: Apply suggested changes
- Click Commit suggestion.
- Type a commit message.
- Click Commit changes.
Next, wait about 20 seconds for actions to run, then refresh this course’s README (the one you’re following instructions from) and a GitHub Action will automatically close this step and open the next one.
Almost there! :heart:
You can now merge your pull request!
:keyboard: Activity: Merge your pull request
- Click Merge pull request.
- Delete the branch
update-game(optional).
Next, wait about 20 seconds for actions to run, then refresh this course’s README (the one you’re following instructions from) and a GitHub Action will automatically close this step and open the next one.
Congratulations friend, you’ve completed this course!
As you continue working on GitHub, remember that high quality reviews improve your projects. If you are new to a repository, inquire about what review practices they have so you can hit the ground running.
Here’s a recap of all the tasks you’ve accomplished in your repository:
- You learned how to assign pull requests for review.
- You left a review on a pull request.
- You suggested changes to a pull request.
- You applied suggested changes to a pull request.
What’s next?
- Try adding a
CODEOWNERSfile to your project to automatically assign reviewers to pull requests. - We’d love to hear what you thought of this course in our discussion board.
- Take another GitHub Skills course.
- Read the GitHub Getting Started docs.
- To find projects to contribute to, check out GitHub Explore.
Get help: Post in our discussion board • Review the GitHub status page
© 2022 GitHub • Code of Conduct • CC-BY-4.0 License
🔗 Three Kata Websites
Three Kata Websites
Throughout the Code Your Future course, you have completed several CodeWars projects, also known as katas.
For most of these katas you will have interacted with them via code: by calling a function or from a test suite. This is a good way to practice solving a problem but unfortunately non-developers will have a hard time seeing what you’ve built.
It is a good idea to show off your work on these katas by creating a website that allows anyone to interact with your code.
You should focus on building an intuitive and good-looking website that integrates the code that you already wrote by completing CodeWars challenges. Don’t try to solve new katas!
Instructions
- Look through your completed CodeWars projects and pick 3 that you would like to turn into websites
- Build out the website, using whatever technology you like.
- You could pick the technology based on what you feel comfortable with, or try to learn something new!
- If you are having a hard time picking, try using the randomly selected technologies from 1000 Paper Cranes!
- Deploy your kata websites to Netlify (or another hosting platform)
- Add links to the kata websites to your portfolio
Acceptance criteria
Please create one pull request per website!
- Deploy the website
- Add the link to your portfolio